Posted on 2 Comments

Free: Star Wars Day *EASY* Embroidery Pattern

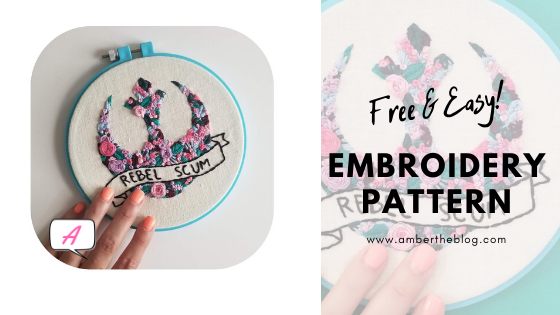
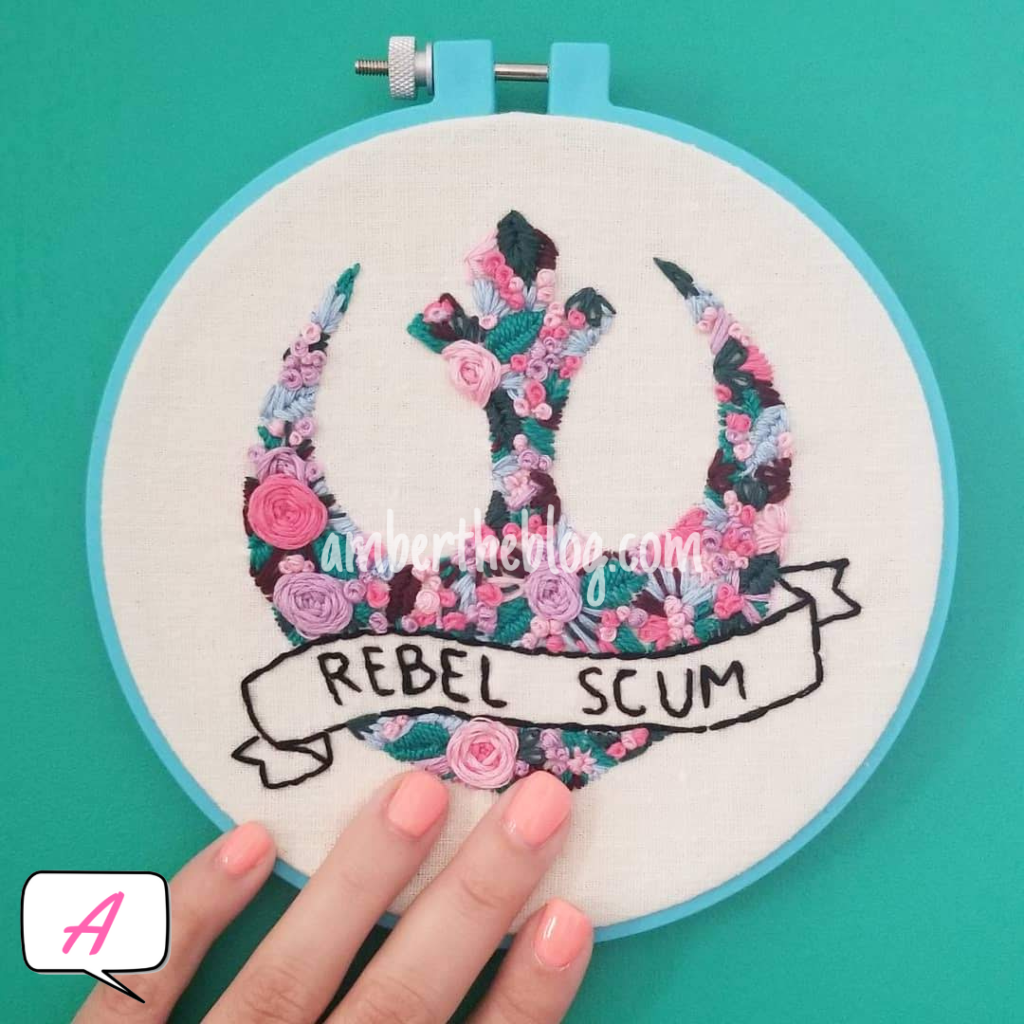
Happy Star Wars Day! Technically, I’m a day late as it’s actually Cinco de Mayo. Or, if you prefer, Revenge of the Fifth. At any rate, in spirit of the unofficial holiday that has become beloved by many the world over, I wanted to give you something to help you enjoy it DIY style: a free embroidery pattern!

This pattern is easy. It uses a few stitches and any can be substituted for something else you prefer. If you’re a stickler for sticking to a pattern, I’ve even included the DMC embroidery color numbers so you can replicate it. But if you want to get creative, I’ve got a bunch of my favorite color palettes on my pinterest board here to get you inspired for something with your own flavor! I tend to prefer complimentary colors or double split complimentary colors.

This post may contain affiliate links. (Spoiler alert: it does.) For the legal jargon (and my personal stance on recommendations) click here. 

Pro tip: keep a small color wheel in your purse or save an image handily on your phone to help in picking out colors. I like this one! It’s a super big help when I’m in the aisle trying to pick out floss for a new project.

If that’s too complicated, just be sure to have my Color Palettes board pulled up for easy reference.

Perfect for beginners or long time stitchers.

Just starting out? No problem! Just take the embroidery floss as is, thread it through your needle, and start stitching. I recommend a booklet of basic stitches kept handy or a youtube video, just in case. Ready to tackle something more challenging? Substitute some bullion knots. Make your thread only three strands. Use a different font. Go all out! It’s YOUR piece so have fun with it!

In the example above, I’ve used the following stitches, all with 6-strand floss:

  • Wagon wheel
  • Modified wagon wheel
  • Daisy chain
  • French knot
  • Herringbone
  • Straight
  • Chain

Fun ways to use it:

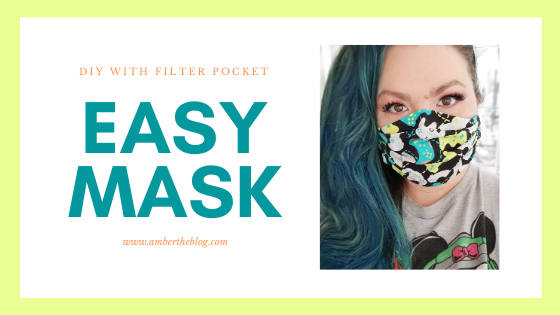
If embroidering on a hoop to hang as decor isn’t your thing, consider adding it to a handkerchief, a shirt pocket, or even swagging out your mask, like Carissa did below! (Thanks, Carissa! This idea is AMAZING!!!)

View this post on Instagram

Yesterday I needed a break from work and my kids so I decided I wanted to do some crafting. I found this awesome pattern from @ambertheblog and shrunk it down to fit on a plain face mask. (Swipe to see the progress shots!) 🧵 I haven’t embroidered anything for more than a year so I am a little rusty but I think it turned out great. ❤️ 🧵 #facemask #rebelscum #theresistance #starwars #starwarscrafts #embroidery #quarantine #quarantinecrafts #craftersgonnacraft #calledtobecreative #craftymom #makersofinstagram #creativelifehappylife #livecolourfully #ihavethisthingwithcolor #showusthecolor #brightcolors #happycolors #myunicornlife #livecolourfully #purplehair #purplehairdontcare #disneylife #starwarsblogger #disneyblogger #disneyprincess #dsmmc #disneysmmoms #crafttheforce

A post shared by Carissa Bonham💚Green Mama (@creativegreenliving) on

“Amber,” you say, rolling your eyes, “give me the pattern already!”

Okay, I hear you. I just had to get so many words in the post so Google would help crafty, geeky, wonderful people like you find it easier! I’m not going to go on like those recipe blogs we all love to whine about where they talk about how they source the flour for the roux from their grandmother’s ancestral town that also makes free-range llama milk.

To get your pattern, just CLICK HERE.

Did you miss it? I know, it was so easy, so simple, anyone could have, really. (I mean, if you’re all the way down here looking for the pattern, you already missed the link in the first paragraph, teehee!)

HERE! CLICK HERE! It’s totally free, no gimmicks. It’s $0.00. Free-fifty. Just add it to your cart and download!

So there you go! For you dark side peeps, don’t worry; I’ve got a free pattern coming your way. There are more patterns and freebies coming, so be sure to subscribe so you don’t miss it!

"XOXO, Amber" in hand-styled script
Posted on Leave a comment

Easy DIY Facemask with Filter Pocket

Hey, all! So with the craziness of COVID-19, medical personnel are incredibly lacking in surgical masks, partly due to factory closures in China and partly due to increase demand by the public and hoarding. To make up for the lack of supplies, there have been multiple requests for capable members of the community to make masks.

Well, TO ARMS, CRAFTERS! If we cosplayers, crafty people, and sewists gather our resources, dig through our tremendous caches of supplies, and supports our communities! If you don’t have these supplies, or there is just a thing or two you’re missing, I’ve got a handy dandy list for you. (And, by the by, I definitely suggest utilizing Amazon or other online service. Most stores are out of elastic because of the many facemask projects. And, of course, if you don’t have to go out, stay home.)

This post may contain affiliate links. For more on that, check here.

Materials:

Tools:

  • Sewing machine
  • Iron (I’ve never used an expensive iron in my life until THIS ONE and WOW. I love ironing now!)
  • Ironing board
  • Ruler or measuring tape
  • Sewing sheers
  • Safety pin
  • Wire cutters (optional)
  • Needlenose pliers (optional)

You need one (1) piece of your main fabric that is 11″ x 8″. You will need to cut two (2) pieces of your lining or inner fabric that are 8″ x 5″. Putting this together is really easy, and is a GREAT beginner sewing project. (You can even use this as a home economics lesson during quarantine lock down!) You need to be able to do is measure, cut and sew a straight line, use an iron, and fold pleats similar to folding a paper fan.

Video Instructions: (psst, watch till the end! <3 )

It’s really as easy as that!

You can also add an optional channel in the top of the mask if you want to add some wire to better conform it to your nose. (However, I’ve found that it’s not necessary for a good fit.) You will add the channel prior to sewing the pleats, and after sewing the three pieces of fabric together. At the top of the mask, sew a rectangle with one short side open to allow you to slid the piece of wire into. The wire should be about 1 1/4″ long. With your needlenose pliers, round the ends to prevent them from poking through the fabric. Slide the wire into the channel, then simply sew it closed before moving onto the pleats.

After you’ve sewn up your mask, you can cut a portion of a vacuum filter bag to aid in filtering out particles. (A study was done and found that vacuum bags are nearly as effective as surgical masks.) But because the internet is a weird place, I’m letting you know that I am not a doctor, a scientist, or in any profession to make a professional recommendation about the ability of these things to protect you or others and I encourage to use common sense and ask a professional and also don’t sue me if you get sick kthxbai.

And now you are ready to make your own mask!

Please share to help others!